Z3 Stereo upgrades, and the
$2 Subwoofer fix
I love my car, but the achilles
heel has been the stereo system. I got the HK factory system with
my '99, and it sounds good, until you lower the top - there's
just not enough volume. Over the life of the Z3, BMW has made
some improvements to the stereo system. The first system just
used a pair of speakers in the front foot wells, then they progressed
to having small filler speakers behind the seats, and then finally
BMW installed a subwoofer between the driver and passenger, in
the place where there used to be a lockable storage bin.
 At this point, you'd think
this would make for a decent system, but it still isn't quite
there. It distorts at higher volumes. Tied to that, the factory
subwoofer apparently doesn't hold up well. Some have reported
(and I have experienced) rattling coming from the subwoofer, which
gets worse when you crank the volume, enough to force you to listen
at a lower volume than you otherwise would.
If you read the Z3 message board or
the articles on MZ3.net You'll find that most people remove as much of
the stock stereo system as possible, and often they remove it
entirely. For a time, I considered that path, but you'll find
that I'm cheap :-). I started with the easier things, such as
replacing the stock head unit with a Blaupunkt Toronto CD player
and a pair of front speakers from Crutchfield.com.
The Blaupunkt installation was a snap,
as Crutchfield supplied a wiring harness adapter. On the other
hand, the speakers I ordered did not fit into the standard foot
well space available, even though they matched 5 1/4" size
of the factory speakers. The screw holes in the speakers were
too close together to properly fit. I was doing this just before
the 1999
Homecoming event, so I didn't have too
much time to worry about it. Instead, I had read that Boston Acoustics
RX-57 speakers were a good fit, so I promptly purchased a pair,
and mounted them in the parking lot of the store I bought them
at.
The improvement in the stereo
was substantial, but not quite enough. At higher volumes, I was
experiencing the dreaded subwoofer rattle. After some inspection,
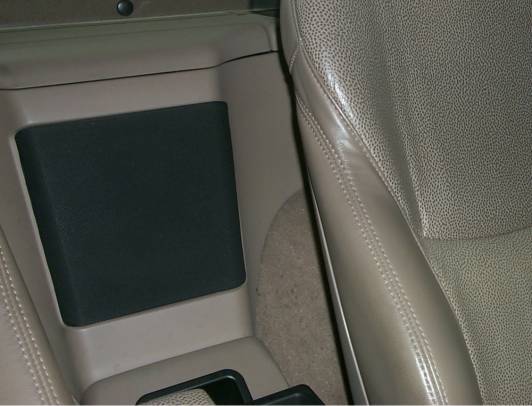
I found this to be related to the horn that comes out from the
subwoofer area. Basically, the subwoofer I have is ported, and
there is an L-shaped oval tube (often called a horn), and
it directs the sound from the subwoofer area to the bottom of
the grille area shown above.
To get a better look inside,
you have to remove the grille. In my model year, this is achieved
by carefully prying out the bottom of the grille, and lifting
up, where the top of the grille acts as a hinge. Once removed,
you can get a look at some of the guts behind the grille.
At this point, you'd think
this would make for a decent system, but it still isn't quite
there. It distorts at higher volumes. Tied to that, the factory
subwoofer apparently doesn't hold up well. Some have reported
(and I have experienced) rattling coming from the subwoofer, which
gets worse when you crank the volume, enough to force you to listen
at a lower volume than you otherwise would.
If you read the Z3 message board or
the articles on MZ3.net You'll find that most people remove as much of
the stock stereo system as possible, and often they remove it
entirely. For a time, I considered that path, but you'll find
that I'm cheap :-). I started with the easier things, such as
replacing the stock head unit with a Blaupunkt Toronto CD player
and a pair of front speakers from Crutchfield.com.
The Blaupunkt installation was a snap,
as Crutchfield supplied a wiring harness adapter. On the other
hand, the speakers I ordered did not fit into the standard foot
well space available, even though they matched 5 1/4" size
of the factory speakers. The screw holes in the speakers were
too close together to properly fit. I was doing this just before
the 1999
Homecoming event, so I didn't have too
much time to worry about it. Instead, I had read that Boston Acoustics
RX-57 speakers were a good fit, so I promptly purchased a pair,
and mounted them in the parking lot of the store I bought them
at.
The improvement in the stereo
was substantial, but not quite enough. At higher volumes, I was
experiencing the dreaded subwoofer rattle. After some inspection,
I found this to be related to the horn that comes out from the
subwoofer area. Basically, the subwoofer I have is ported, and
there is an L-shaped oval tube (often called a horn), and
it directs the sound from the subwoofer area to the bottom of
the grille area shown above.
To get a better look inside,
you have to remove the grille. In my model year, this is achieved
by carefully prying out the bottom of the grille, and lifting
up, where the top of the grille acts as a hinge. Once removed,
you can get a look at some of the guts behind the grille.
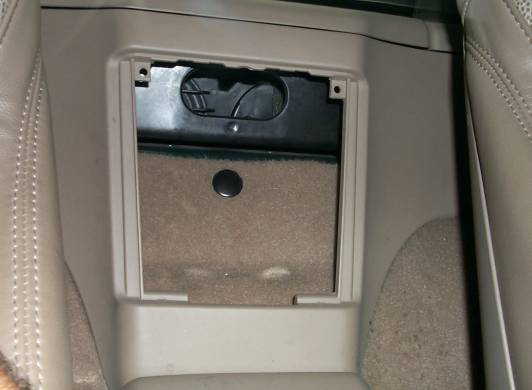 If you wish to learn more
about the guts of the stereo, you can check out this article on
MZ3.net that Robert Leidy put together
when he dissected his subwoofer. It suffices to say that the horn
fits into the oval that you see, and it opens out at the bottom.
As you can see, the corners of the horn have caused the indentations
that you see in the carpeting at the bottom of the inside of the
grille area.
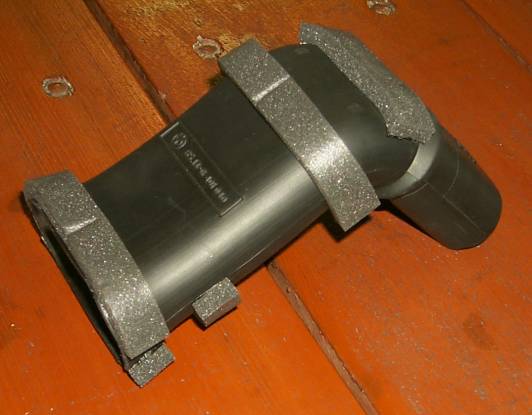
I decided to experiment a
little with using the horn. With it removed, I did not experience
any buzzing in the stereo, but the bass response was substantially
muted. It became obvious that the horn is necessary for proper
audio response of the subwoofer. I spent a little bit of time
with the grille off and the horn installed, and I began to notice
that the horn would not stay in place. Subwoofers, in general
give off puffs of air on deeper bass notes, and these puffs of
air (which I like to call poots :-) were actually causing
the horn to dislodge itself from where it connects in to the subwoofer
area. Later on, I reinstalled the grille, and the buzzing returned.
Clearly, the horn was only buzzing when it was confined behind
the grille.
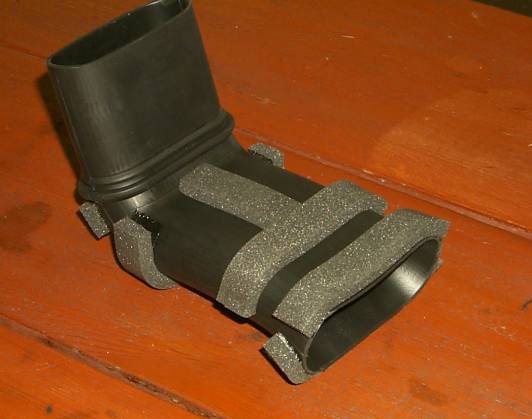
I decided to see if there
was some way to cushion the horn so that it wouldn't rattle around
when it was behind the grille. Rather than pad the whole area
behind the grille, I decided to pad just bits of the horn itself.
I chose some 3/8" self-adhering home window insulation from
Home Despot, and placed it on areas where I saw potential for
contact between the horn and the rest of the compartment. I chose
foam insulation rather than foam rubber, because it's spongier,
and appears to me that it would last longer. Here's where I attached
the insulation.
If you wish to learn more
about the guts of the stereo, you can check out this article on
MZ3.net that Robert Leidy put together
when he dissected his subwoofer. It suffices to say that the horn
fits into the oval that you see, and it opens out at the bottom.
As you can see, the corners of the horn have caused the indentations
that you see in the carpeting at the bottom of the inside of the
grille area.
I decided to experiment a
little with using the horn. With it removed, I did not experience
any buzzing in the stereo, but the bass response was substantially
muted. It became obvious that the horn is necessary for proper
audio response of the subwoofer. I spent a little bit of time
with the grille off and the horn installed, and I began to notice
that the horn would not stay in place. Subwoofers, in general
give off puffs of air on deeper bass notes, and these puffs of
air (which I like to call poots :-) were actually causing
the horn to dislodge itself from where it connects in to the subwoofer
area. Later on, I reinstalled the grille, and the buzzing returned.
Clearly, the horn was only buzzing when it was confined behind
the grille.
I decided to see if there
was some way to cushion the horn so that it wouldn't rattle around
when it was behind the grille. Rather than pad the whole area
behind the grille, I decided to pad just bits of the horn itself.
I chose some 3/8" self-adhering home window insulation from
Home Despot, and placed it on areas where I saw potential for
contact between the horn and the rest of the compartment. I chose
foam insulation rather than foam rubber, because it's spongier,
and appears to me that it would last longer. Here's where I attached
the insulation.
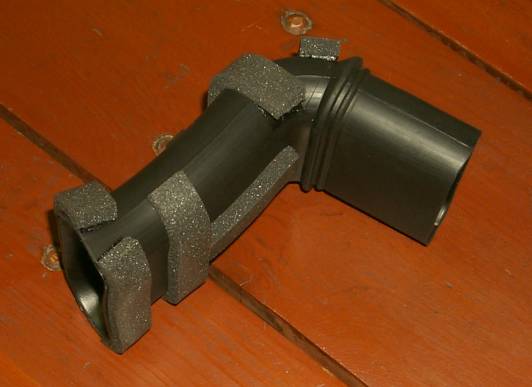
 As you can probably see, the
insulation is not staying glued to the horn around the rounded
corners, but you get the general idea. After taking these pix,
I trimmed off the portions around the sides so it wouldn't peel
off completely.
The result? Well, I'm very
impressed at how much of a difference it made! I do NOT hear any
buzzing, even at higher volumes. The subwoofer is still underpowered
(remember, I haven't replaced the Amplifier yet), but given the
elimination of the subwoofer buzz, the quality ain't terrible.
You may have noticed in the
top pic that there's a crease in the insulation. That comes from
the center of the grille, so you can see that there's some cushioning
between the grille and the horn. Also, in the top pic, you'll
see that I placed two pieces of insulation at the 'corner' of
the horn. Those two pieces seem to keep the horn in place instead
of having it pop out when the subwoofer is pooting.
Not bad for a $2 cost. If
you're not really into spending hundreds of dollars to replace
the sub, this is worth considering! I still haven't replace the
amplifier yet, but I may yet do that!
As you can probably see, the
insulation is not staying glued to the horn around the rounded
corners, but you get the general idea. After taking these pix,
I trimmed off the portions around the sides so it wouldn't peel
off completely.
The result? Well, I'm very
impressed at how much of a difference it made! I do NOT hear any
buzzing, even at higher volumes. The subwoofer is still underpowered
(remember, I haven't replaced the Amplifier yet), but given the
elimination of the subwoofer buzz, the quality ain't terrible.
You may have noticed in the
top pic that there's a crease in the insulation. That comes from
the center of the grille, so you can see that there's some cushioning
between the grille and the horn. Also, in the top pic, you'll
see that I placed two pieces of insulation at the 'corner' of
the horn. Those two pieces seem to keep the horn in place instead
of having it pop out when the subwoofer is pooting.
Not bad for a $2 cost. If
you're not really into spending hundreds of dollars to replace
the sub, this is worth considering! I still haven't replace the
amplifier yet, but I may yet do that!
Go back to the Photo Page